Introducing Leshy SpriteSheet Tool
Posted by
Doug Haber
on 2013-12-03
Introduction
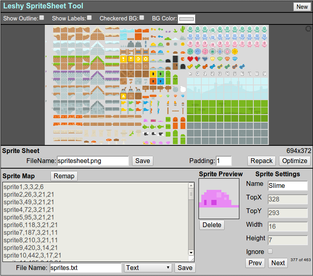
Leshy SpriteSheet Tool is a browser-based utility for creating,
packing, and modifying sprite sheets and texture atlases. This post
discusses the various features and how to use them.
This is unrelated to
Leshy
SpriteSheet Animator which is used for previewing, editing, and
testing animations from sprite sheets.
Launch Leshy SpriteSheet ToolFeatures- Build and pack a new sprite sheet from images and other sprite sheets
- Add or remove images from an existent sprite sheet
- Modify or maintain sprite map/texture atlas layout details
- Convert sprite map/texture atlas layout files into a different
format (including things like CSS, JSON, XML)
- Create a new mapping for an existent sprite sheet
- Repack an existent sprite sheet to get a better file size
- Create maps for sprite sheets that are missing them by
automatically detecting the sprites within them
- Create ImageMagick scripts to rebuild sprite sheets from the
command line or as part of a build process
Introduction
Leshy SpriteSheet Tool can be used to perform a large number of
different sprite sheet related tasks. Everything is done client
side in the web browser. Assets are never sent to any server.
I use the term "sprite sheet" as a synonym for "texture atlas."
There is some debate about this, and some people believe there are
subtle differences. The term "sprite sheet" seems to have lost some
popularity over the years, except possibly when dealing with
animations. This tool always uses the term sprite sheet, but nearly
anything here should apply just as well to texture atlases.
Usage
Adding New Sprites
Sprites are added to a sprite sheet by dragging and dropping them
onto the application's web page. PNG files are preferred, but GIF
and JPEG should work as well. Multiple files may be dropped at
once.
Zooming and Dragging
The viewport may be zoomed in or out from a position using the mouse
wheel. The + and - keys can be used to zoom in and from the center
of the viewport.
By pressing and holding the right mouse button over the viewport and
moving the mouse, it is possible to drag the viewport.
At any time the viewport may be restored to its default settings the
0 key, or by clicking the refresh icon in the upper right corner of
the viewport.
Importing Sprite Maps
If an existent sprite sheet is dropped onto the page it will assume
that the image is one large sprite. In order to get it to recognize
the individual sprites you may either
remap the
sprite sheet or import a sprite map.
A sprite map is imported by dragging and dropping it onto the page.
The current version supports dropping sprites in Text, JSON, and
JSON-TP formats. Once a sprite map is dropped, all sprites in it
should show up as separate entities with names associated with each
them. It is then possible to do any other operation, such as
editing or repacking the sprite sheet.
Replacing Sprites
Sprites may be replaced by dropping a new sprite with the same file
name. If a sprite sheet and map are loaded, this makes it possible
to easily replace files.
If a dropped file has different dimensions than then current sprite
with that name, then the sprite sheet will automatically be
repacked. This will invalidate any sprite map, but it is necessary
in or for things to fit.
Packing Sprite Sheets

When new images are added the sprite sheet is automatically
repacked. The Repack button may be used to force a repack to
be done. The Optimize button does the same thing as
the Repack button, but it spends 5 seconds attempting to
randomly manipulate the resulting sprite sheet to see if it can find
a tighter fit. Since it is random, multiple presses may in some
cases yield increasingly better results. If an attempt to repack
does not result in a better fit, then no change will be made.
The Padding option defines the amount of padding to use
between sprites in pixels. The default is 1 pixel. This may be
disabled by using the value 0. Changing the amount of padding
forces a repack.
Remapping Sprite Sheets
If a sprite sheet is dropped into the application and no sprite map
is available, then remapping can be used to attempt to create a new
sprite map. It does this by detecting the edges between sprites.
In order for this to work the background must be transparent and
there must be 1 pixel or more of padding between sprites. To
perform a remap, press the Remap button located above the
sprite map.
Before a remap, hovering the mouse over a dropped sprite sheet image
will show that the selection is the entire image. After the remap,
the selections should show as the individual sprites. If a sprite
is detected that lines up with an existent sprite, the name will be
preserved. Otherwise, names are just will be automatically
assigned, such as "sprite123".
Grid Based Remapping
UPDATE: This was added in version 0.8.1 (2014-05-29)
A grid remap allows a sprite sheet to be mapped out into a perfect
grid of rectangles of the same size. To use this tool, press
the
Grid Remap button located above the sprite map. In the
dialog that appears, enter the height and width of the sprites and
then press submit. The image will then be converted into a
perfect grid of sprites of the specified dimensions. Empty cells
will be left empty, and any that are exact matches for existent
sprites will maintain their name and other settings.
This tool is very useful for working with images that are perfect
grid of sprites. After doing a grid remap, each sprite can be
named and other actions can be performed, such as adding sprites,
removing sprites, repacking, or exporting sprite maps.
This tool maps out the grid including any defined padding, so if a
grid remap is being done off of multiple sprites, be sure to set
the padding appropriately.
Grid remaps currently only work with perfect grids, and no padding
or offsets are supported.
Joining Sprites
Sprites can be joined by selecting a sprite and then another while
holding down the shift key. This will merge the original sprite,
the selected sprite, and all others that fall within the rectangle
that they fit into.
Deleting Sprites
Sprites can be deleted either with the Delete button, or by
selecting them and pressing CTRL+DELETE. To delete an area of
sprites, first join them together, then delete them.
Editing Sprite Maps
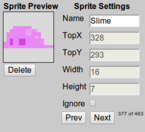
Sprite maps are edited in the "Sprite Settings" area. When a sprite
is selected all the settings fill into this area for that sprite.
Sprites may be selected by clicking on them.
The Name of a sprite may be modified. This name will be used
in various export formats as the name of the sprite. Sprite names
must be unique. Some sprite map formats will not support certain
characters in the name. These will be automatically converted to '_',
and may possibly result in name collisions. To be safe, sprite map
names should contain alphanumeric characters and the underbar.
The Ignore control is used to indicate a sprite should not show
up in sprite map exports. The sprite still remains in the image
file for the sprite sheet, but is not referenced in the map.
The "Prev" and "Next" buttons cycle through to the previous or next
sprite. From the keyboard this can be done with the bracket keys ([
and ]). A keyboard shortcut also exists for cycling only through
unnamed sprites. This is done with CTRL+[ or CTRL+] and can be useful
for making sure each sprite has a proper name before exporting.
Exporting Sprite Maps
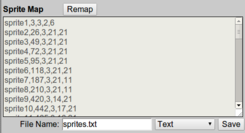
Sprite maps may be exported into a variety of formats:
Text
A very simple CSV (comma separated values) format.
name,x,y,width,height

For Example:
burrito_warrior,100,100,64,64
This is the easiest format. It is very basic, but it gets the job
done.
SpriteSheet Tool supports loading sprite maps from this format.
JSON
A simple JSON (JavaScript Object Notation) format.
[
   {
      "name": "burrito_warrior",
      "x": 100,
      "y": 100,
      "width": 64,
      "height": 64
   }
]
This provides a straightforward JSON list of objects. One object
will exist for each non-ignored sprite.
CSS
A CSS (Cascading Style Sheet) format.
.burrito_warrior {
   background: url('spritesheet.png') no-repeat -100 -100;
   width: 64px;
   height: 64px;
}
This format creates a style sheet with a class for each sprite.
Each class references the name of the export PNG file, which can
be set with the "File Name" field for the Sprite Sheet.
There are many ways to make usage of the sprites. Usually they
start with including the stylesheet in the <head> section of
the web page. For example:
<link rel="stylesheet" href="sprites.css"></link>
Once the style sheet is loaded, elements can be set to the class.
This can be used on its own or combined with other CSS, to do
things like positioning the element. For example:
<div class="burrito_warrior"></div>

<!-- Or, with some positioning: -->
<div class="burrito_warrior" style="position: fixed; left: 250px; top: 250px"></div>
JSON-TP-Hash
UPDATE: This was previous known as the
JSON-TP format. It was changed to JSON-TP-Hash, since we now
support JSON-TP-Array as well. (2014-02-11)
A JSON format aiming for compatibility with TexturePacker's JSON
export format. This is the hash version, where the frame list is
stored as an hash, where the key is the filename. If an array is
preferred, see
JSON-TP-Array.
{
   "frames": {
      "burrito_warrior": {
         "frame": {
            "x": 100,
            "y": 100,
            "w": 64,
            "h": 64
         },
         "rotated": false,
         "trimmed": false,
         "spriteSourceSize": {
            "x": 100,
            "y": 100,
            "w": 64,
            "h": 64
         }
      }
   },
   "meta": {
      "app": "https://www.leshylabs.com/apps/sstool/",
      "version": "Leshy SpriteSheet Tool v0.8",
      "size": {
         "w": 64,
         "h": 64
      },
      "scale": 1
   }
}
This is fairly similar to the intended format. If further changes
are needed for compatibility, post in the comments.
JSON-TP-Array
UPDATE: This was added in version 0.8 (2014-02-11)
A JSON format aiming for compatibility with TexturePacker's JSON
export format. This is the array version, where the frame list is
stored as an array, and each frame object contains a "filename"
key. If a hash of frames is preferred,
see
JSON-TP-Hash.
{
   "frames": [
       {
          "filename": "burrito_warrior",
          "frame": {
             "x": 100,
             "y": 100,
             "w": 64,
             "h": 64
          },
          "rotated": false,
          "trimmed": false,
          "spriteSourceSize": {
             "x": 100,
             "y": 100,
             "w": 64,
             "h": 64
          }
      }
   ],
   "meta": {
      "app": "https://www.leshylabs.com/apps/sstool/",
      "version": "Leshy SpriteSheet Tool v0.8",
      "size": {
         "w": 64,
         "h": 64
      },
      "scale": 1
   }
}
XML
An XML format aiming for compatibility with a popular XML
export format.
<textureatlas imagepath="spritesheet.png">
   <subtexture name="burrito_warrior" x="100" y="100" width="64" height="64">
   </subtexture>
</textureatlas>
Binary
A simple binary format.
Each sprite is listed as:
| Field | Type |
| Sprite Name | Null Terminated String |
| X Position | Unsigned 16-bit Integer |
| Y Position | Unsigned 16-bit Integer |
| Width | Unsigned 16-bit Integer |
| Height | Unsigned 16-bit Integer |
All integers are stored in little-endian.
ImageMagick
Creates an ImageMagick command for building the sprite sheet.
convert \
        -size 200x200\
        canvas:none \
        -draw "image SrcOver 100, 100, 64, 64 burrito_monster.png" \
        spritesheet.png
This exporter generates commands that when run use the ImageMagick
convert to build the sprite sheet from its pieces. When possible,
it uses the names of the original files. It assumed that they are
in the current directory as is the output file.
This makes it possible to easily rebuild the sprite sheet from the
command line. Commands generated from this exporter may be used
in build scripts. This makes it possible to drop in new versions
of art without having to repack or make use of the web based
sprite sheet tool again. This will work, so long as the
dimensions of the art have not changed.
Keyboard Shortcuts
| Key | Action | Key | Action |
| + | Zoom In | - | Zoom Out |
| 0 | Reset Zoom | CTRL + DELETE | Delete the Selected Sprite |
| [ | Previous Sprite | ] | Next Sprite |
| CTRL + [ | Previous Unnamed Sprite | CTRL + ] | Next Unnamed Sprite |
Other
If you encounter any problems using this software, please post a
detailed response in the comments of this page explaining how to
recreate the issue along with your browser and version. A link to a
sample sprite sheet could be helpful as well.
I have tested this primarily in Chrome, but also performed light
testing on Firefox and Opera. Since HTML5 features are used, a
recent version of these browsers may be required. Due to a lack of
availability and interest, IE is untested and likely won't work.
Chrome is highly recommended.
This is commercial software and it may not be redistributed. The
source code is closed and due to reliance on proprietary game engine
code, will likely remain that way. It is currently made available
for usage on LeshyLabs.com with no warranty. For more details,
please see our
Legal Notices page.