Capturing Linksys Log Events in Linux
Posted by
Doug Haber
on 2014-09-16
Introduction to LinkLog
While reconfiguring a Linksys router I came across the Log section
of the settings. It seemed potentially useful to be able to see
network activity, so I searched around for information on how to use
the settings. Linksys had at some point released software for
Windows, but never for Linux. After figuring out what the setting
was sending, I decided to write a utility.
The log settings allow an IP address on the local network to be
specified as a destination for the log. In order to find out what
was going on, I used the Tcpdump packet analyzer, which revealed
that when the log was enabled, UDP traffic was coming in on port
162. This meant it was likely SNMP trap data. From this I wrote a
little test program and was quickly able to extract the messages
from the packets.
The packets seem to occur only for TCP and UDP traffic. A packet is
sent when a connection is initiated, and the message doesn't
necessarily mean that a connection occurred. For example, a TCP SYN
only port scan against your router's IP will result in a packet for
each port that receives a SYN, regardless of whether a connection is
ever established. The packets are sent by UDP, and when the router
is under heavy load, a lot of messages do start getting lost, so
this shouldn't be considered a reliable logging technique.
While this isn't perfect and it doesn't provide a lot of details, it
still is a handy way of getting a picture of what is happening on
the network. You can find out things, such as what servers are
contacting your router on the internet. If you put an appliance on
your network, you can use this to see what traffic goes in and out
of it, or how often it calls out to external servers. You may also
use this to discover if anything is using your network that you
aren't aware of, such as an unwelcome wifi user.
Features
- Capture packets from Linksys routers (and possibly others)
that send SNMP log information to a defined host.
- Unix-style command line tool with many configurable options.
- Define filters to restrict network traffic displayed based on
the host name, IP address, protocol, and destination.
- Redfinable template based output to allow customizing the
program's display format.
- Support for running as a non-privileged user via port
forwarding (which still requires root to configure initially.)
- No dependencies beyond Perl and its core modules, so this
should work on any operating system that supports Perl. Tested
on Linux and Windows with Cygwin.
Setup and Installation
Enabling Logging on the Router
Before the LinkLog program can be used, a router must be setup to
send the logging traffic to the host that the LinkLog program will
run on. The option to enable this is usually found on the Linksys
router's configuration under Administration->Log.
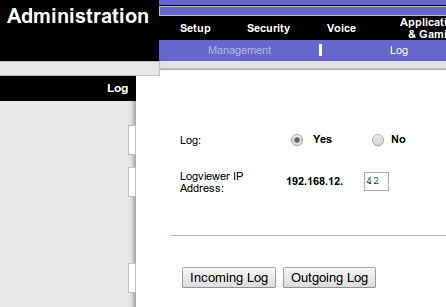
On the Log page the "Log" option must be set to yes, and the
"Logviewer IP Address" should be set to the address of the host that
LinkLog will be running on.
Not all Linksys routers support logging to an external host. If the
"Logviewer IP Address" option is missing, then it may not be possible
to use LinkLog with that router. It is possible that updating the
firmware may add the missing option. Switching to an alternate
firmware may provide other types of logging options.
The official Linksys utility for viewing these logs is no longer
easily available, which leads me to wonder if newer Linksys routers
have stopped supporting this feature.
Installing LinkLog
LinkLog is a stand-alone Perl script. It may be run from any
location, or be installed by copying it into a directory in the
path, such as a bin/ or sbin/ directory. There are no other
dependencies than Perl. Only core Perl modules were used, so any
Perl installation should work. This was written for Linux, but will
likely work on other operating systems.
Executing LinkLog
In order for LinkLog to work it must listen on port 162. In the
Unix world, any port below 1024 is considered privileged, and so
root access is required to launch LinkLog. If this is not
acceptable, LinkLog may be setup to listen on a different port by
using the
--port option. For example, in Linux, traffic can
be forwarded with iptables:
### As root, setup a forwarding rule so that all UDP traffic to port 162
### goes to 9162 instead.  NOTE: If you have anything else using port 162,
### such as an SNMP daemon, do not do this.

iptables -A PREROUTING -t nat -p udp --dport 162 -j REDIRECT --to-port 9162

### Then, as a normal user, execute linklog with the port set to 9162
linklog --port=9162
Be aware that with the port forwarding enabled, any user on the
system could potentially listen on the destination port.
Usage
General Arguments
    --cache-dns                   Store and reuse results of DNS queries
    -h, --help                    Show usage information
    -p, --port={port}             The port to listen on
    --run-as={user}               After initialization, run as this user
                                  (default is 'nobody')
| --cache-dns | When enabled, LinkLog will store all DNS query results so
that queries for the same IP address are never repeated. This
can speed things up, but isn't necessary if external name server
caching is used. NOTE: Items in the DNS cache do not currently
expire, and so using this option will cause memory usage of the
process to grow over time. For this reason, under most
conditions this option is not recommended. |
| -h, --help | Display the usage information |
| -p, --port={port} | Set an alternate port to listen on instead of the default of
162 (SNMP-TRAP.) This may be used with port forwarding to
allow running as non-privileged user. |
| --run-as={user} | If LinkLog is executed as root, once it opens the sockets
and log files it will change to another user so that it no
longer operates with superuser permissions. By default, the
user 'nobody' is used, and the --run-as option may
specify an a different user to become. If LinkLog is not
running as root this option will have no effect. |
Filter Arguments
When filters are used, only traffic matching the filters will be
shown.
If multiple filter arguments are used, the results will be ANDed
together. This means that only traffic that matches each rule
will be displayed.
Filters may use * as a wildcard. For example:
| *.example.com | Match anything ending with '.example.com' |
| 192.168.* | Match anything beginning with '192.168.' |
| 10.*.1 | Math anything starting with '10.' and ending with '.1' |
    --filter-direction={IN|OUT}   Limit traffic to only inbound or outbound
    --filter-ip={filter}          Limit traffic based on the IP address
    --filter-ip-dest={filter}     Limit traffic based on destination IPs
    --filter-ip-source={filter}   Limit traffic based on source IPs
    --filter-host={filter}        Limit traffic based on host names
    --filter-host-dest={filter}   Limit traffic based on destination host names
    --filter-host-source={filter} Limit traffic based on sound host names
    --filter-protocol={TCP|UDP}   Limit traffic to TCP or UDP protocols
| --filter-direction={IN|OUT} | Show only inbound or outbound traffic. |
--filter-ip={filter}
--filter-ip-dest={filter}
--filter-ip-source={filter} | Show only traffic where the IP address matches the filter.
The options --filter-ip-dest
and --filter-ip-source may be used to create an IP
address filter that only applies to the destination or source IP
addresses. |
--filter-host={filter}
--filter-host-dest={filter}
--filter-host-source={filter} | Show only traffic where the host name matches the filter.
The options --filter-host-dest
and --filter-host-source may be used to create a host name
filter that only applies to the destination or source host name |
| --filter-protocol={TCP|UDP} | Show only traffic that matches the specified protocol. |
Output Control Arguments
    -l, --log-file={filename}     Write all traffic data to a file
    --no-dns                      Show IPs instead of host names
    --no-dns-dest                 Show destination IPs instead of host names
    --no-dns-source               Show source IPs instead of host names
    -q, --quiet                   Do not display output (used with -l)
    -s, --show-port-numbers       Show port numbers instead of service names
    -t, --template={template}     Set the template for displaying traffic.
                                  Default is: %t [%i, %p] %s:%S -> %d:%D
| -l, --log-file={filename} | When enabled, all traffic data will be written to the named
file. Traffic will still be written to STDOUT as well, unless
the --quiet option is used to suppress that output. |
--no-dns
--no-dns-dest
--no-dns-source | When these options are enabled, IP addresses will be shown
instead of host names. DNS queries may be unnecessary and
avoided when this is enabled, unless other options such as host
name filtering require it. The three variants allow IP
addresses to be shown for all addresses (--no-dns), or
just the destination addresses(--no-dns-dest) or source
addresses (--no-dns-source.) |
| -q, --quiet | This flag disables all logging of traffic data to STDOUT.
Generally, it is only used in combination
with --log-file. |
| -s, --show-port-numbers | By default, LinkLog shows the service names associated with
ports, if there is one. This option disables looking up service
names, and instead always shows the port numbers. |
| -t, --template={template} | This option allows customization of the string displayed
when displaying traffic. For more information and examples, see
the Template Tokens section below. The
default value is:
%t [%i, %p] %s:%S -> %d:%D |
Template Tokens
       %a - Source IP address           %s - Source host
       %A - Destination IP address      %S - Source port
       %d - Destination host            %t - Current timestamp
       %D - Destination port                 (Same as: %M %T %h:%m:%z)
       %i - Direction (' in' or 'out')  %T - Current day
       %h - Current hour                %w - Current day of the week
       %m - Current minute              %y - Current year (4 digit)
       %M - Current month               %Y - Current year (2 digit)
       %p - Protocol ('UDP', or 'TCP')  %z - Current second
A template string may be passed to the
--template argument in
order to change the output format. The above tokens will
automatically be replaced with the described value. The default
template is:
%t [%i, %p] %s:%S -> %d:%DImplementation
After seeing the output in Tcpdump, I quickly threw together some
Perl code to extract the message. Each relevant message had a
string in it that began with '@in' or '@out', and then followed a
consistent format. I decided that instead of implementing proper
SNMP parsing, I would just extract the parts through a regular
expression. I try to avoid having dependencies, and so I didn't
consider any SNMP modules. I'm not sure if there is other useful
information in the packet, but the string alone seemed to provide
everything needed.
Once the proof of concept worked, I added in some command line
argument parsing
via
Getopt::Long
as well as the remaining features. Everything came together really
quickly and easily, and the end result is a program that feels like
it fits in well in a Unix-like environment.
For anyone wondering why Perl was chosen, the primary reason is
because I knew that I could get this entire project done with all
its features in just a few hours in Perl. I'm a big proponent of
Perl, and while familiarity definitely plays some role in the
preference, Perl naturally feels like home to Unix and C
programmers, and I think that is a huge advantage over many similar
languages.
When it comes to style I made a few notable decisions that altered
the design. Only Perl core modules were used. This means that any
Perl installation should have everything needed to run the program,
and users don't have to installing anything from CPAN. It also
means it will likely work with Perl installs on other operating
systems.
I chose to write this as a single script. It could have been broken
down into modules and written differently to be a little more clean,
but I thought there was more benefit to making it trivially easy to
install and use, rather than breaking it apart, since this isn't a
large program.
GitHub
This program is available under a BSD open source license. The
latest version may be
found
on GitHub.